Tips and Tricks eBlast:
Utility Edition
Employee Department Transfer
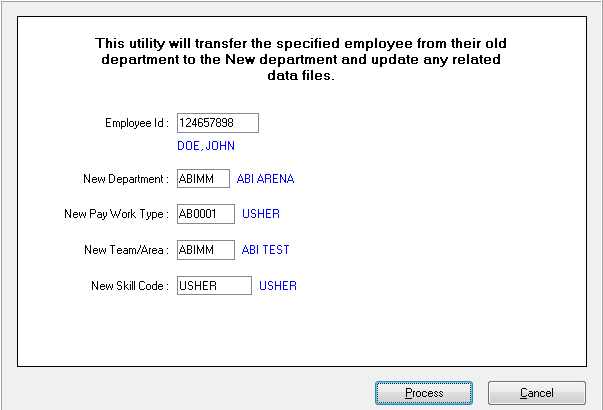
If you have an employee who has moved from one department to another, the most efficient way to transfer that employee is the aptly named Employee Department Transfer utility. This function will change the home department of an employee while maintaining all their history in the system. For departments where training is required, the utility will automatically create training entries for them at the time of the transfer. To perform the transfer, navigate to the Utilities menu within Applications Menu, select the employee to transfer (double click or click the F5 key to zoom), and choose a new Department, Pay Work Type, Team/Area, and Skill (Image 1). The process button will activate the utility and perform the transfer.
NOTE: If the employee has Non-Scheduling Defaults assigned, the information will be cleared as it does not apply to the new department.
Image 1
Create an Event Template
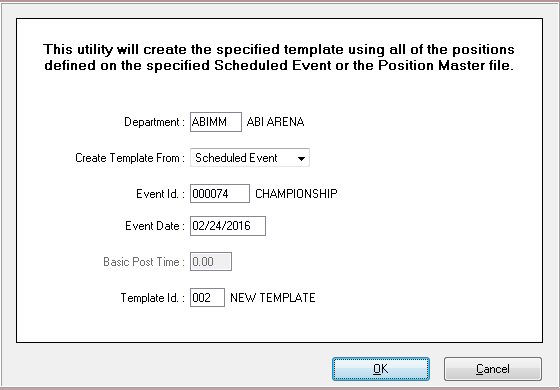
Have you ever had the perfect schedule for an event and thought, “This schedule should be a template for future events?” Well we’ve made it easy for you to do this by using the Create an Event Template utility. This utility allows you to create a template from an existing event schedule and keep the number of positions, post/end time adjustments, and redeploys you may have set up for a specific event and use it again. To use this utility, navigate to the Applications Menu where you’ll find it in the Utilities menu. You then only need to specify your department, choose the Scheduled Event function, select the event you want to make the template from (the date will auto-fill), and select the Template Id you want to copy this information to.
Image 2
Modify Badge Information
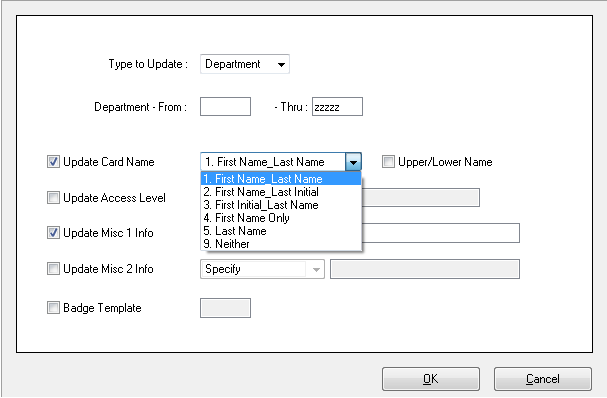
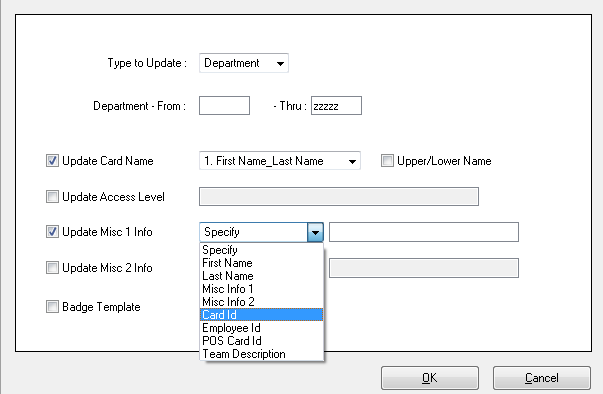
If you ever decide to change your credentials, never fear that you’ll have to update each and every employee. The Modify Badge Information utility allows you to update every badge in your department, multiple departments or vendors. Whether it’s just the department name on the Access Level, changing the Badge Template, or copying a name or Card Id on the Misc. fields, you can make those changes all at once. Navigate to the Utilities menu of the Applications Menu. From there, once you select the Modify Badge Information utility, then all you need to do is choose Department or Vendors, specify the Department or range, and check the fields you want to update. In addition to modifying a badge template, you can auto-fill the Card Name and Misc. fields with information from the employee’s profile (Image 3 and 4). Clicking OK will initiate the utility and update your badges.
Image 3
Image 4

